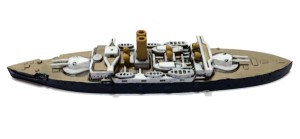
I’ve adapted my normal speed painting technique to paint 1/1500 War Times Journal pre-dreadnoughts. That technique is optimized for 1/2400 scale capital ships that use the World War 1 and later “battleship grey” paint schemes. However, pre-dreadnought paint schemes use different colors and often include two of the hardest colors to get right — black and white. (As an aside, War Times Journal has a very good review of the color schemes of the various navies during the pre-dreadnought period).
To get good results, I had to modify my normal technique. This is a work in progress, so as I refine the technique, I’ll update this page. The first test was a British Majestic class battleship:
It turned out okay, but I’m not entirely happy with it. It took too long to paint, and the result is substandard in my opinion. As I’ve noted elsewhere, I focus on painting stuff to a decent tabletop standard and doing so quickly. Some of the extra time was spent adapting my standard technique. This is actually a bigger deal than it might sound. One downside of my standard technique is that it can look pretty awful until you get the final matte coat done. Thus, changing the techniques “on the fly” can be challenging. Also, certain tasks take the same amount of time whether you’re painting one miniature or a twenty miniatures. These tasks include setting up and tearing down the airbrush, changing airbrush colors and spraying the matte finish. So amortizing these tasks over a dozen models (instead of 2 models) will reduce the painting time significantly (on a per model basis).
The painting challenge is that white and black are hard colors to get right.
For black hulls, I used Games Workshop Mechanus Standard Grey, thinned and darkened with Vallejo Game Color black ink. Unfortunately, I did not write the recipe down, so I’ll have to add it later. That went quickly enough, though it was definitely slower than painting the grey hulls of WWI and WW2 battleships. In addition, some of the black got on the decks. Touching-up the decks took three coats of Light Mud to cover the black. Still, painting the hulls didn’t consume too much extra time.
But the white parts were very challenging. It required multiple coats of Games Workshop Ceramite White to cover the Light Mud. That white is very thick and covers well in that state. Unfortunately, when thinned, it covers far worse. In addition, it took multiple coats to touch up the wash.
My standard wash was too strong when indiscriminately applied to the model. It discolored the white, which required more touchup work. And it made the shadows too large in some of the high-detail areas. On the second model, I applied the wash far more carefully and was diligent in cleaning it off of large flat areas. It’s easier to clean the wash off than to go back and touch up white surfaces. Anyhow, I’m much happier with the second model (the Cressy class armoured cruiser):
On the next batch of models, I’ll do two things to speed the process up. First, I’ll be much more careful with the wash and will be diligent in cleaning any overspill. This will take a little longer, but will minimize the touchup work on the white surfaces. Second, I will try other techniques to get better white coverage.
The most promising experiment so far has been to thin the Ceramite White with Daler-Rowney white ink. If this doesn’t produce significantly better coverage, I’ll carefully airbrush white on all the flat white areas, then touch up the overspray on the deck. My airbrushes are capable of very fine work, so this is doable. While time-consuming, it will take far less time than brushing multiple white coats. A third option would be to paint the white surfaces with a light grey, followed by a white. I’ll be evaluating all of these techniques and will update this page when I’ve settled on one.
Finally, I found a way to easily add the red line at the waterline of British ships. I did this after I painted and photographed the ships above. I’ll take some new shots and post them. To add the red waterline markings:
- Paint hull normally.
- For the red waterline stripe, use a fine brush with a very good point. I use Rosemary & Co. Kolinsky Sable brushes. They keep a superb point.
- Carefully paint stripe with Games Workshop Mephiston Red. This paint can cover a black hull with one coat. And, its slightly darker color looks good on ships. The line should be pretty thin, but you can correct stripes that are too wide in the next step.
- Using a black Sharpie marker, touch up the red stripe so that it is even. Despite being black, the Sharpie blends perfectly with my hull. (As an alternative you can touch up with a brush. But the Sharpie seemed to work better for me).
- The Sharpie touch-ups will be semi-glossy, but the final matte coat will handle that.
Summary of Colors for British Ships:
- Hull — Games Workshop Mechanus Standard Grey, thinned and darkened with Vallejo Game Color black ink
- Waterline Stripe — Games Workshop Mephiston Red
- Deck — Vallejo Panzer Colors Light Mud
- White areas — Games Workshop Ceramite White, thinned with Daler-Rowney white ink
- Funnels — old Games Workshop Iyanden Darksun


